Wednesday, April 12, 2017

How to Rip DVD for Playback on Galaxy Tab S2


To play DVD on Galaxy Tab S2, try to convert Blu-ray to Galaxy Tab S2 friendly video first. Read this article, you will know how to.

The Samsung Galaxy Tab S2 is drop dead sexy with its 2560 x 1600, 10.6, AMOLED screen; rich gold trim and faux titanium bronze dimpled back. Galaxy Tab S2's brilliant screen, plentiful storage capacity and slender build make it a great tablet for everyday use at home or on the go. However, you may be disappointed that you could not just play DVD discs on Galaxy Tab S2 directly, since there's no DVD drive with it.


In order to play DVD movies on play DVD on Galaxy Tab S2, you just need a DVD ripping tool, enable you to rip DVD disc into digital foramt which is playable on Galaxy Tab S2, such as MPEG4, H.264, H.263, WMV, DivX, Xvid, VC-1, etc.

Although there are a lot of DVD rippers and converters on the market, here we'd like to recommend Dimo Video Converter Ultimate to you. Why we decided on it because, it not only would do what users need but because, it's really easy to use even for a novice. With this DVD ripping tool, you can fast rip and convert DVD movies to Galaxy Tab S2 playable format MP4 in its original quality with optimized video settings as easy as A, B, C. 

Besides, it can also help you rip videos from DVD playing on Samsung Galaxy S7/S7 Edge, Galaxy Note 4, Galaxy Note Pro, Galaxy Tab Pro, Galaxy Tab 4, Surface, Apple TV, iPad, iPhone, Kindle Fire HD, Xbox, Gear VR, PS VR, HTC Vive, Oculus Rift, etc. Plus, you can also select desired audio tracks for specific chapters; decide movie resolution, aspect ratio, bitrate and more. Awesome. For Mac users, please get DVD Ripper for Mac - Dimo Video Converter Ultimate for Mac. Below is the detailed guide on the DVD to Galaxy Tab S2 conversion process.

Free Download Dimo Video Converter Ultimate (Win/Mac):


Other Download: 
How to Rip DVD for playing on Galaxy Tab S2 Easily

Note that this guide uses Dimo Video Converter Ultimate screenshots to better describe how to finish ripping DVD to Galaxy Tab S2. The way to do this on Windows is the same. So just make sure you get the right version.

1. Load DVD files

Insert your DVD disc to the DVD drive and run DVD Ripping software. Click the "Add DVD" button to add the DVD movies you want to rip. If you need to rip DVD with wanted audio track, you can click the drop down menu after "Audio" to select your desired tracks.


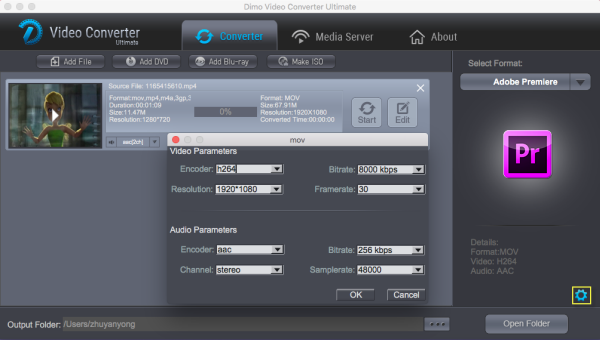
2. Select output format

Click the output format dropdown list; you'll get a lot of choices. For converting DVD to Galaxy Tab S2, you can select "Samsung > Galaxy Tab S2" as output format. By choosing Galaxy Tab S2, you'll convert your DVD movies to videos with optimized settings to fit Galaxy Tab S2 8.0 or 9.7. Or depends on your device, you can choose a suitable video format from catalogues.

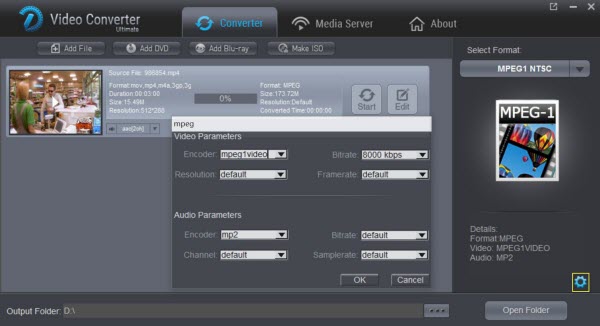
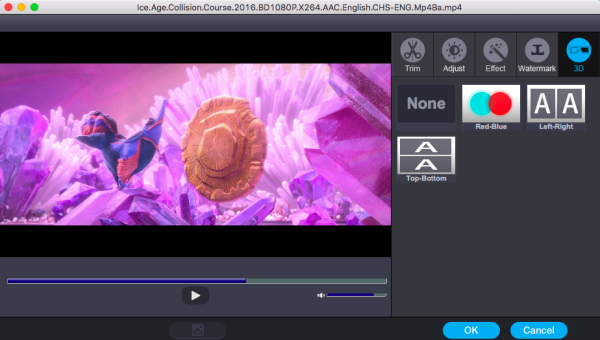
Tip: If you like, you can click "Settings" to change the video encoder, resolution, frame rate, etc. as you wish. Keep in mind that bitrate higher results in big file size, and lower visible quality loss, and vice versa.


3. Start to rip

After the above steps, you can go back to the main interface and hit the "Start" button to begin converting DVD to Galaxy Tab S2 compatible video format. When the conversion is completed, tap "Open" to located the ripped video files. connect Samsung Galaxy Tab S2 to PC and then drag and drop the converted files into the right folder of the memory card. Now start enjoying your beloved DVD movies on Galaxy Tab S2 8.0 or 9.7 anytime and anywhere you like!

Mirror converted DVD movies from Galaxy to TV

You just swipe your finger down from the top of the screen and press the Quick Connect button to start searching for nearby TVs on the same Wi-Fi network. Samsung says Quick Connect will work with any smart TV that is DLNA compatible. After you connect, you can mirror your Galaxy Tab S2's display on your TVs to display converted DVD movies. Or use Dimo's free media server to share converted movies to TV on large screen wirelessly.

Free Download or Purchase Dimo Video Converter Ultimate:


Need the lifetime version to work on 2-4 PCs so that your friends and family can instantly broaden their entertainment options? Please refer to the family license here


Kindly Note:

The price of Dimo Video Converter Ultimate for Windows is divided into 1 Year Subscription, Lifetime/Family/Business License: $43.95/Year; $45.95/lifetime license; $95.95/family license(2-4 PCs); $189.95/business pack(5-8 PCs). Get your needed one at purchase page.

Related Software:

BDmate (Win/Mac)

Lossless backup Blu-ray to MKV with all audio and subtitle tracks; Rip Blu-ray to multi-track MP4; ConvertBlu-ray to almost all popular video/audio formats and devices; Copy Blu-ray to ISO/M2TS; Share digitized Blu-ray wirelessly.

DVDmate (Win/Mac)

A professional DVD ripping and editing tool with strong ability to remove DVD protection, transcode DVD to any video and audio format, and edit DVD to create personal movie.

Videomate (Win/Mac)

An all-around video converter software program that enables you to convert various video and audio files to formats that are supported by most multimedia devices.

8K Player (Win/Mac)

A mixture of free HD/4K video player, music player, Blu-ray/DVD player, video recorder and gif maker. 

Contact us or leave a message at Facebook if you have any issues.

Related Articles:

Monday, April 10, 2017

Solution to Importing MKV files into Adobe Premiere Pro CS5/CS6/CC


Facing problems when opening MKV files or editing MKV videos in Adobe Premiere Pro CS5/CS6? Just get the best MKV to Premiere Converter to achieve your goal smoothly.

While looking to edit some MKV movies (ripped with MakeMKV, download from online or from other source), the only problem is that NLE like Adobe Premiere Pro won't import MKV files directly, and you may come across lots of problems, such as nothing shows up on the screen, or there is only image or you only get sound in Premiere Pro. If you're having trouble editing MKV files in Premiere Pro CC (2017), CS6, CS5, etc., just read on for details.


Actually, Adobe Premiere Pro supported video formats do not include MKV format. So what's the best way to resolve the MKV and PPro incompatibility issue? Well, as we've found out yet, the easy workaround is to transcode MKV to a more editing-friendly format, such a Premiere Pro's MOV or MPEG-2 codec. with Dimo Video Converter Ultimate for Mac.

It's an optimal MKV converter that helps you decode MKV files when converting into a different, and ideally more edit friendly format for Premiere Pro. So you can edit MKV footage with Premiere Pro CC/CS6/CS5 without any issue. Beside, this video convert program can also help to convert MKV to Avid Media Composer, Final Cut Pro, iMovie, FCE, etc. Plus, with the built-in video editing feature of the program, you can trim, crop, add watermark, set effect and more to your video files so as to bring you a wonderful home movie as you want. If you want to transcode MKV to Premiere Pro on Windows, please turn to Dimo Video Converter Ultimate. Now download the software and follow the steps to re-encode .mkv to Premiere Pro for editing.

Free Download Dimo Video Converter Ultimate for Mac/Win:


Other Download: 


How to Successfully Import MKV into Premiere Pro CC/CS6/CS5

Step 1: Import MKV files

Run MKV to Premiere Converter for Mac and load source MKV clips to it. You can import MKV clips to the program through "Add File" button. You can also directly drag the video files into the program directly. Not only MKV file, but also MP4, AVI, VOB, WMV, FLV, etc are supported. Batch conversion is supported by the latest 3.0.0 version, so you can load more than one file to save time.


Step 2: Choose Premiere Pro preferred format

Click "Select Format" pull down list to select "Editor > Adobe Premiere" as the best video format for Premiere Pro. WMV, MPEG-2 formats from "Format > Video" are the good choice as well.

Tip -Profile Settings: In case the default settings do not fit your requirement, you can click "Settings" button and enter "Profile Settings" panel to adjust video size, bit rate, frame rate, sample rate and audio channels.


Step 3: Start conversion

Click "Start" button to start convert MKV for importing to Premiere Pro CC/CS6/CS5. When the conversion task is finished, click "Open" button to get the exported files.

Step 4: Import converted MKV files into Premiere Pro

You're now ready to get the result files into Adobe Premiere Pro to do further editing. Launch Premiere Pro on your Mac, choose "File > Import" to import any file. If you prefer to use keyboard shortcuts, press Command+I to open the standard Import dialog.

Free Download or Purchase Dimo Video Converter Ultimate for Mac/Win:


Need the lifetime version to work on 2-4 Macs so that your friends and family can instantly broaden their entertainment options? Please refer to the family license here


Kindly Note:

The price of Dimo Video Converter Ultimate for Mac is divided into 1 Year Subscription, Lifetime/Family/Business License: $43.95/Year; $45.95/lifetime license; $95.95/family license(2-4 Macs); $189.95/business pack(5-8 Macs). Get your needed one at purchase page.

Related Software:

BDmate (Mac/Win)

Lossless backup Blu-ray to MKV with all audio and subtitle tracks; Rip Blu-ray to multi-track MP4; Convert Blu-ray to almost all popular video/audio formats and devices; Copy Blu-ray to ISO/M2TS; Share digitized Blu-ray wirelessly.

DVDmate (Mac/Win)

A professional DVD ripping and editing tool with strong ability to remove DVD protection, transcode DVD to any video and audio format, and edit DVD to create personal movie.

Videomate (Mac/Win)

An all-around video converter software program that enables you to convert various video and audio files to formats that are supported by most multimedia devices.

8K Player (Mac/Win)

A mixture of free HD/4K video player, music player, Blu-ray/DVD player, video recorder and gif maker. 

Contact us or leave a message at Facebook if you have any issues.

Related Articles:

Friday, April 7, 2017

Tricks Importing MP4 to Camtasia Studio 9/8/7 Smoothly


In this post, we’ll examine how to import Mp4 into Camtasia Studio for editing with smooth workflow.

You would handle kinds of video files daily, including YouTube MP4 videos, Sony MP4 Camcorder videos(XDCam-EX), GoPro MP4 footage, game MP4 recordings with OBS(Open Broadcaster Software), etc. And in order to get more wonderful videos, you probably will choose to edit .mp4 files with Camtasia which is a good option your screen and edit your videos to get professional-like videos before sharing to YouTube or FaceBook. While, there are dozen of .mp4 files can't be imported into Camtasia software, for the complex video codec of MP4 files. This article will be along with you to root the trouble and solution out here.


Some people including you may be confused: Camtasia says it supports MP4 at Techsmith support site, but why I can't import MP4 to Camtasia Studio? Well, that's because Camtasia prefers AVC/h.264 at no more than 30 frames per second instead of others while MP4 can contain various video codecs. So if you MP4 files are not accepted by Camtasia Studio, it's probably because of the video codec incompatibility.

To fix the problem, you'll need to convert those MP4 to a more editing-friendly format for Camtasia Studio with a MP4 file converter app. Dimo Video Converter Ultimate which is an easy-to-use MP4 converter for you, which can help you change MP4 into a Camtasia Studio accepted MPEG-1/MOV/MP4 with least quality loss. You should then be able to import the new file into Camtasia Studio with smooth editing without any trouble. 

The all-in-one and easy-to-use toolkit can convert all other popular video formats like AVI, MOVMXF, WMV, MKV, FLV, ASF, M2TS, VOB, etc. to Camtasia Studio natively supported video formats on Windows (Windows 10 included) with fast encoding speed. For Mac users, just get Dimo Video Converter Ultimate for Mac to get th job done. See how below about converting MP4 files to Camtasia Studio format.

Free Download Dimo Video Converter Ultimate (Win/Mac):


Other Download: 

How to Convert MP4 files for Editing in Camtasia Studio 9/8/7

Step 1. Load .MP4 files

Drag & drop MP4 files to the program directly. Or go to the "Add file" to locate the MP4 files you want to add. You can add several files to do conversion at the same time.


Step 2. Select the output format

Click "Select Format" bar and then move your pointer to "Format" and turn to "HD Video" or "Video" and choose MPEG-1 or MOV as target format. Besides, you can also choose AVI, WMV, MP4, etc. if you want to get a relatively smaller output file.

Step 3 (optional): Adjust the video, audio settings

Click "Settings" to fix the frame rate, bitrate, video size, etc to your needs. If you want to edit in Camtasia Studio without having to render the clips while editing, all the frame sizes must be the same as the sequence settings. You can save a lot of render time by making all the clips the same size with this MOV video converter.


Tip: Furthermore, you are provided some useful edit functions cropping, trimming, adding watermark, adjusting effects for pre-editing your video files so that you can simplify your Camtasia Studio editing.

Step 3. Start MP4 to Camtasia Studio conversion 

Click the "Start" button to start the MP4 to Camtasia conversion. Just in a few minutes, you make it.

Step 4. Import MP4 into Camtasia Studio

After the conversion, click "Open" to locate the result videos and then launch Camtasia Studio and click "Import media" import the converted MP4 video into Camtasia Studio; prepare for editing. You will find that it's just a piece of cake to edit MP4 files in Camtasia Studio. 

After editing or recording, you can export video toCamtasia Studio for playing and sharing.

Free Download or Purchase Dimo Video Converter Ultimate:


Need the lifetime version to work on 2-4 PCs so that your friends and family can instantly broaden their entertainment options? Please refer to the family license here


Kindly Note:

The price of Dimo Video Converter Ultimate for Windows is divided into 1 Year Subscription, Lifetime/Family/Business License: $43.95/Year; $45.95/lifetime license; $95.95/family license(2-4 PCs); $189.95/business pack(5-8 PCs). Get your needed one at purchase page.

Related Software:

BDmate (Win/Mac)

Lossless backup Blu-ray to MKV with all audio and subtitle tracks; Rip Blu-ray to multi-track MP4; ConvertBlu-ray to almost all popular video/audio formats and devices; Copy Blu-ray to ISO/M2TS; Share digitized Blu-ray wirelessly.

DVDmate (Win/Mac)

A professional DVD ripping and editing tool with strong ability to remove DVD protection, transcode DVD to any video and audio format, and edit DVD to create personal movie.

Videomate (Win/Mac)

An all-around video converter software program that enables you to convert various video and audio files to formats that are supported by most multimedia devices.

8K Player (Win/Mac)

A mixture of free HD/4K video player, music player, Blu-ray/DVD player, video recorder and gif maker. 

Contact us or leave a message at Facebook if you have any issues.

Related Articles:

Wednesday, April 5, 2017

VLC Play DVD - Easily Play DVD movies with VLC Media Player


You may want to play DVD movies via VLC media player, but the experience isn't smooth. Wonder how to get your VLC to play encrypted DVD discs? Read the following article carefully, you will find the answer.

"What is wrong with my VLC Media Player? When I trying to use VLC to play a DVD, an error message pops out: "VLC Player cannot play this DVD because there is a problem with digital copy protection."


As a VLC user you would assume it plays DVD-Video disc you purchase from Amazon or local store. Don't be surprised if you find it otherwise. You can't use VLC Player to play DVD-Video disc. The reason for this is that there are copy protection present on most commercial DVDs.

So, is there an easy way to import DVD files to VLC Media Player? Absolutely yes! Just rip the disc and then convert the DVD video to the more manageable format (i.e. wmv) that VLC Player will read. Whether you're going to rip discs for VLC Media Player video file or backup on hard drive, our DVD ripping software of choice is Dimo Video Converter Ultimate

Instead of VLC, it can strip commercial DVDs of their CSS encryption, and convert the movie files of DVD to whatever format you need. And the software lets you tweak just about everything after you've got the movie from disc. Plus, it also provides pre-configurated profiles for those who intend to watch the movie on a handheld gadget. Some of you may be using a Mac computer, please visit Dimo Video Converter Ultimate for Mac.

Free Download Dimo Video Converter Ultimate (Win/Mac):


Other Download: 


How to easily convert DVD to VLC in high quality

1. Insert your DVD disc to the DVD-ROM, then launch the DVD ripping software and click the "Add DVD" button to have the DVD content imported. In addition to DVD, Blu-ray and video files like MP4 MOV, VOB, AVI, WMV, etc.are also supported.


Note: You can freely choose the audio track as you like for output.

2. Click the "Select Format" bar and you can choose "Format -> Video -> MP4/MKV" as the target format. This format can be played well on your iTunes, iPad, Apple TV also. 

Tip: You can also check the "Settings" box , and set video codec, video size, Bitrate, frame rate to get a decent video you want on your VLC player.

3. Hit Start button to start DVD conversion. During the process, you can view detailed progress info, and preview the progress with real time images. OK. Leave the rest to the best DVD to VLC Converter, and everything will be done very quickly.After conversion, you can click the "Open" button to find the converted DVD files. Mow you can add and play the BD contents with VLC player at ease.

Just like the saying goes, where there is a will, there is a way. Watching DVD movies on VLC and transferring to devices for enjoying anywhere you like is easy as ABC now.

Free Download or Purchase Dimo Video Converter Ultimate:


Need the lifetime version to work on 2-4 PCs so that your friends and family can instantly broaden their entertainment options? Please refer to the family license here


Kindly Note:

The price of Dimo Video Converter Ultimate for Windows is divided into 1 Year Subscription, Lifetime/Family/Business License: $43.95/Year; $45.95/lifetime license; $95.95/family license(2-4 PCs); $189.95/business pack(5-8 PCs). Get your needed one at purchase page.

Contact us or leave a message at Facebook if you have any issues.

Related Articles:

Monday, March 6, 2017

How to Transfer DVD to iTunes (iTunes 12) library

iTunes cannot rip DVD to iTunes directly. Read this page to get the best tool to rip DVD to iTunes for playing on iPhone/iPad/iPhone with simple steps.

iTunes (12.1.3) is used to manage the digital music and video files on Apple's devices. People would like to play purchased or rental DVD with iTunes. Because it is easy to play your DVD movies on devices that support iTunes such as iPad, iPhone or iPod Touch without ever needing to use the DVD again. However, it is important to acknowledge the fact that iTunes cannot rip DVD to iTunes. That should not be a reason to worry you, since there are some of the best DVD to iTunes rippers which can aid in converting DVD to iTunes supported format, so that you then can add those DVD content into iTunes library to be able to access all these quality movies on your iPhone and iPad.


To rip DVD to iTunes and play DVD movies on iTunes library, the very first thing you need to select proper video and audio formats during DVD to iTunes video conversion. Sometimes you may also need to know why iTunes doesn't accept your video files even when these files are with extensions as required by iTunes. 

Below we've listed the video and audio formats supported by iTunes

iTunes supports any video format that works with QuickTime and files purchased or downloaded from iTunes store. Files with a .mov, .m4v, or .mp4 file extension could be recognized by iTunes. 

iTunes supports MP3, AAC, AIFF, WAV, Audible .aa files and purchased M4A and M4P music files from iTunes store. Also, iTunes can convert audio files between MP3, WAV, AAC, AIFF, Apple Lossless.

Though MakeMKV and HandBrake perform excellent as a DVD to iTunes conversion solution combo, it would be a little bit complicated and you have to download 2 apps and carry out multiple settings before you finally get iTunes M4V, MOV or MP4 files. Is there a DVD to iTunes converter that combines all the goods of MakeMKV and HandBrake? Of course yes. Dimo Video Converter Ultimate for Mac/Dimo Video Converter Ultimate offers you the best DVD to iTunes video conversion solution on Mac (OS Sierra included). 

This DVD to iTunes Converter could be considered as a combination of MakeMKV and HandBrake. It owns both MakeMKV's disc decrypting ability and HandBrake's re-encoding feature, which make it extremely easy to rip DVD to iTunes MOV, MP4 or M4V files all in one.

Besides, it provides good quality output regardless of the end device that you are going to use. And it converts DVD yet DVD to any format supported by iPhone/iPad/iPod with customizded profile settings in simple steps. Just get it and rip videos from DVD disc to iTunes supported videos for playback on your iPhone 7/7 Plus, iPad Air 2, iPad Mini 4, iPod touch 6, etc. in just a few mouse clicks!

Free Download Dimo Video Converter Ultimate for Mac/Win:


Other Download: 
How to Convert DVD movie to iTunes with high video quality

Step 1. Load DVD movies

Place the disc from the DVD-ROM. Launch the DVD to iTunes converter; click "Add DVD" button to import DVD movies into the program. Loaded DVD movies can be previewed by clicking. In addition to DVD, Blu-ray and SD/HD/4K video files can be supported.


Step 2. Decide on output format

Click the drop down box of "Select Format", through which it is possible to select iTunes highly compatible format like H.264 MP4, MPEG-4 from "Format > Video" profile list. If you want to add the DVD movie to iTunes for play on iPhone, iPad, iPod, Apple TV, etc., you can also directly select iPhone, iPad, Apple TV or iPod as the output format to get videos with optimized settings for your iDevices. 

Tip 1: Do video/audio settings (Optional)

If you need, you can also click "Settings" to modify parameters of your output profile to meet your professional needs: bit rate, frame rate, aspect ratio, etc.


Tip 2: Edit DVD movies (Optional)

You can even use it's built-in editor to edit your output video by cropping, adding watermarks, trimming and setting 3D effect and so on.


Step 3. Start ripping DVD to iTunes

The final step is to tap the "Start" button and commence converting DVD movies to iTunes files.

Step 4. Add DVD movies to iTunes

After the conversion, click on "Open" button to access to the videos you ripped. Open your iTunes. You could simple click the “File > Add File into Library” to browse and add DVD (now in iTunes compatible video format) into iTunes movie library. Then you could see your selected movie appear in “Home Videos” group. In this method, you could add almost all files into iTunes movie library (those are compatible with iTunes). Here you could get another effective method to transfer DVD to iTunes.

2-step guide on how to put DVD movies on iTunes:

#1. Simply navigate to your iTunes Media folder. If you don't know where your iTunes Media folder locates, you could open "iTunes > Preferrence > Advanced” tab to check.

#2. Copy the movie files (in MOV, MP4 or M4V) into the Automatically Add to iTunes folder. After copying, your movies would appear in iTunes movie library.

After that, you can transfer and watch DVD on iTunes or your iPod, iPhone, iPad, Apple TV and more Apple devices freely. On Apple TV, I browse the iTunes library for the movie and it plays smoothly and at full quality. I don't think it could get much simpler (unless of course, Apple provides native support for DVD which doesn't seem likely).


Free Download or Purchase Dimo Video Converter Ultimate for Mac/Win:


Need the lifetime version to work on 2-4 Macs so that your friends and family can instantly broaden their entertainment options? Please refer to the family license here


Kindly Note:

The price of Dimo Video Converter Ultimate for Mac is divided into 1 Year Subscription, Lifetime/Family/Business License: $43.95/Year; $45.95/lifetime license; $95.95/family license(2-4 Macs); $189.95/business pack(5-8 Macs). Get your needed one at purchase page.

Contact us or leave a message at Facebook if you have any issues.

Related Articles:
Source: Simple Way to Get A DVD into iTunes on Mac/Win